Showing posts with label diy. Show all posts

Friday, September 23, 2011

Friday Favorites: Birthday Edition

I've been in a birthday mood lately. I have always loved birthdays. Except for my 20th. That one was pretty rough for me. I think for me it just meant I was really growing up. Like it was serious now. Anybody else have that same experience?

Anyways, my best friend turned 21 earlier this month and I have been in a birthday kick since then. So I thought I would let you in on the fun!

Birthday Gifts on the Hour
via
How cute is this idea? This means you would get 24 presents on your big day! And personally, I think 24 small things are much better than one big thing. Unless it's a car. Because that definitely wins.

Grand Entrance
via
How fun is this?! I don't know anyone who wouldn't enjoy busting through a door of streamers. I might have to try this on a gloomy day. It's sure to make me feel better.

Birthday Board
via
This is more for a classroom than a family. It's a great way to keep track of everyone's birthday.

Birthday Rolex
via
This is also a classroom idea. How cute are those cards?!

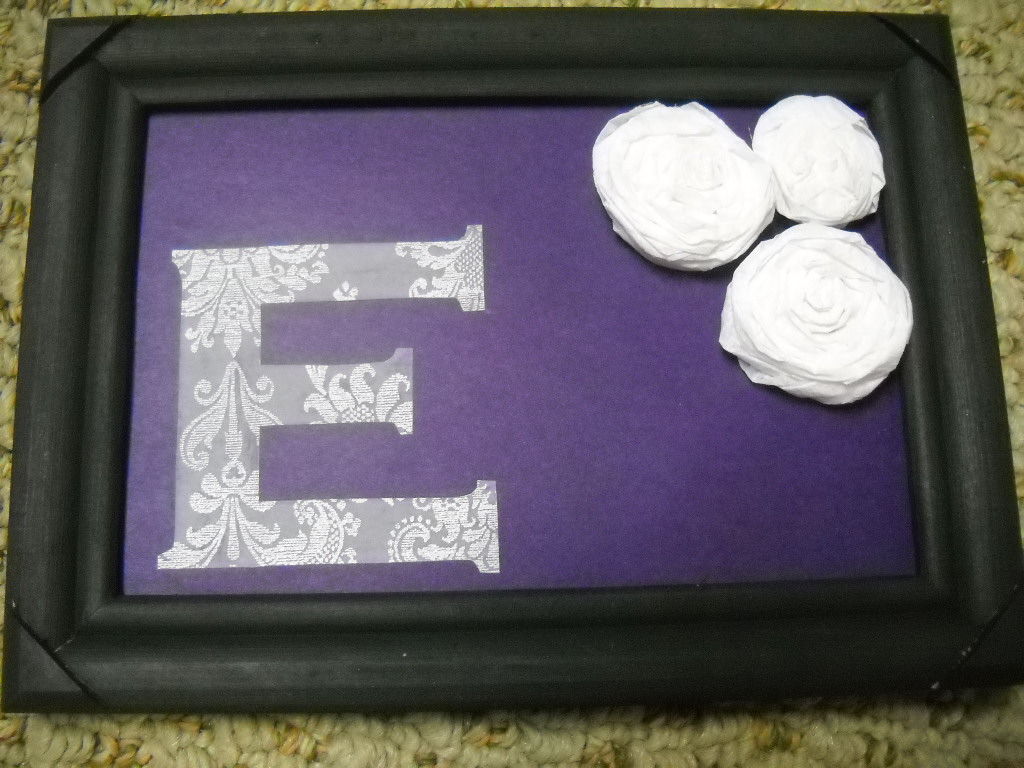
Monogrammed Frame

I made this recently for my best friend. I loved how it all turned out! Such an easy but perfect gift.


All of these ideas (except for the last one) are courtesy of Pinterest (what else?!). I'm not kidding, y'all. I'm so obsessed with Pinterest. Just so we're clear.

Friday, August 19, 2011

Monogram Frame

Remember when I told you about the snail mail swap??? Well this is the tutorial on how I made my gift!

Whenever you're getting a small gift for under $10, there is always a struggle. At least, that's how I feel. I want to give something that is cute but that is also something the receiver won't want to throw away. The perfect solution? A monogramed gift.

I decided to just use the letter for the first name of my partner. I bought a small wood frame and painted it black to give it a more elegant look.


When I was trying to decide what to put on the inside, I thought the best way to go would be to pick her favorite color. Luckily, she has great taste, as aubergine is her favorite pick. For those of you (like me) who don't know what that color is, it is similar to an eggplant color.


I cut a 4x6 size piece of paper to place in the frame. Instead of keeping the glass in the front, I put it behind the paper so I could add roses to the paper. Putting the glass in the back allows you to have a hard surface and gives you the ability to add 3D touches. The tutorial for these roses can be found here.


The last step was to add the letter. I found some great scrapbook paper, printed out a big "E", then traced it on the fancy paper. It was a little time consuming, but definitely worth the end result.


It turned out so well that I want to make one for myself! This is a great gift for any girl. Who doesn't like getting a personal gift?!

If you have any great DIY gift ideas, be sure to let me know!

Crafty Lady

{Warning: This post is a little on the long side. Just wanted to give you a heads up!}

When I was younger, I was not a big fan of sewing and crafting, much to my mother's (and grandmothers') dismay. My maternal grandmother owned a fabric store for years, my paternal grandmother sews, and my mom sews as well. Unfortunately, I had no interest in learning. I am regretting that very much now that I'm older. I mentioned it to Gramma when we were in South Carolina and she made me a sewing kit with her supplies from her store. Hopefully I can pick it up quickly.

In the meantime, I have been doing other crafts that require little or no sewing. I have found a lot of great ideas on blogs that I was dying to try. This idea for felt pom-pom balls is super easy and cute. I made one in about 20 minutes, with cutting the circles occupying much of that time.

This next idea is my favorite. Unlike the pom-pom balls, it takes FOREVER!! But the end result is so worth it. I can't remember where I found the idea but many other blogs have the directions. I'll give you my instructions, but you can easily search for more on Google.

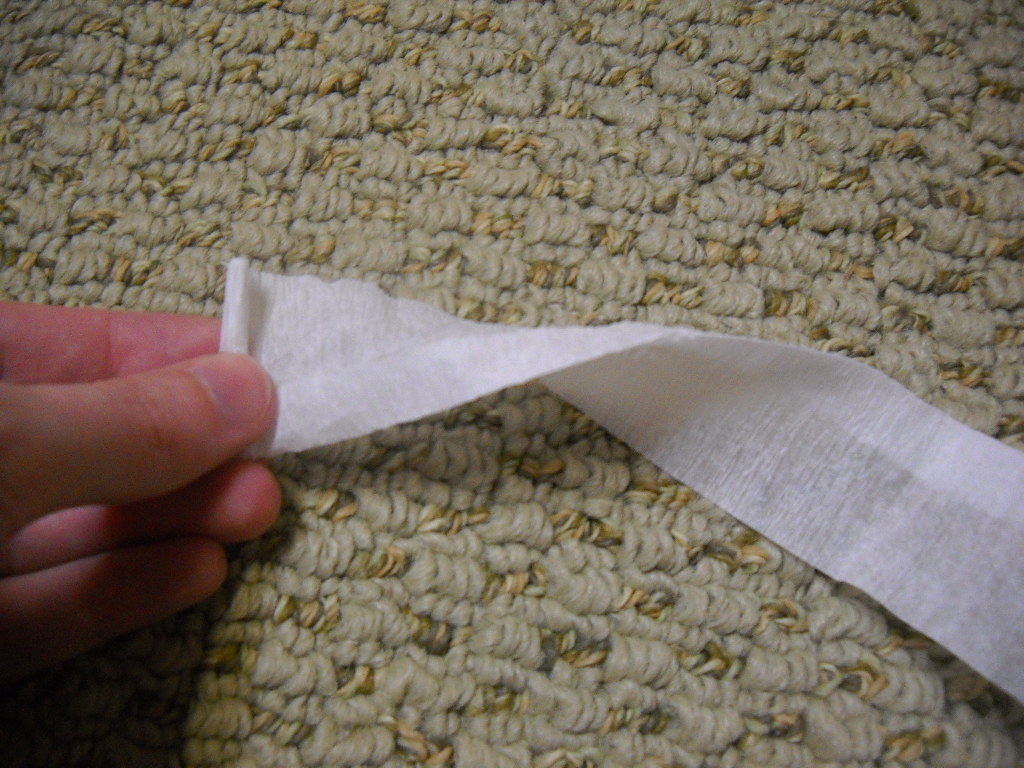
  • Take a roll of streamers and cut strips of 24 inches in length. Crumble the strips to make them softer, then straighten them back out. 
  • Start rolling on one end, beginning with tight rolls and gradually getting looser.
  • Use a hot glue gun to secure the ends (and maybe a few dots as you're rolling).
  •  Smush (apparently that isn't a word but I use it all the time) the top when you're done and voila! A paper rose.


Mine are not as wide as others, but the styrofoam balls I used were small, so the tight look works well. Just play with it until you get the desired look. Mine are short because I folded the strips in half. If you don't fold the strip in half, you will have a longer stem that you may need to cut off. It will also be easier to make a wider, looser rose if you do not fold the strips.


If you want the roses to look like the white ball (more like a real rose):

  • Start by twisting the strip just like the first directions. I folded the edge up a little to make the tissue paper shorter.


  • Now, continue twisting the roll as you twist the paper strand. This is super confusing so look at the pictures below.


  • Glue the end the same way you would with the other type of flower.

    You'll have a stem hanging off, so just glue it up to the bottom of the rose.


    Final product:


    Once you have enough roses, start gluing them on the styrofoam ball. If you use the first type of rose, it takes A LOT to cover the ball. My advice to you: Watch a chick-flick (or the Bachelorette) while you work. You'll get them done in no time. If you use the latter type, you won't need as many.

    The next post coming up uses the white roses in a whole different way. You don't want to miss it!

    Call Me Martha Stuart

    Fridays now have a whole new meaning for me. I have no classes! So that means I can work and then start my weekend early. This weekend, I'll be setting up the apartment and getting everything finished. Fortunately, Zeb is going home so I won't have a messy boy anyone in my way.

    This week's edition of Friday Favorites is going to be devoted to a few of the crafts I've been doing. As I type, I have cookies in the oven, HGTV on the tube, and a huge craft box sitting next to me. Just call me Martha Stuart.

    Favorite Wall Art: Toilet Paper Rolls


    Remember when I posted back here about my favorite DIY project? Good news friends: I finally have enough rolls to make it. 28 rolls to be exact. It may not be enough to completely finish the project, but it will definitely give me a great start.

    Favorite Present: Monogram Frame


    This was my gift I sent for the snail mail swap. Stay tuned today for how I made it.

    Favorite Accent: Tissue Paper Flowers


    I'll also be showing you how I made these later today.

    What are some of your favorite things??

    Related Posts Plugin for WordPress, Blogger...